In the world of project management and business planning, anticipating and addressing potential risks is crucial. Enter the risk mitigation slide - a powerful tool for communicating your risk management strategy. But what exactly is a risk mitigation slide, how do you create one, and what are the best practices? In this article, we bring you real-life examples and best practices based on our years as McKinsey, BCG, and Bain consultants. Let's dive in.
What is a risk mitigation slide?
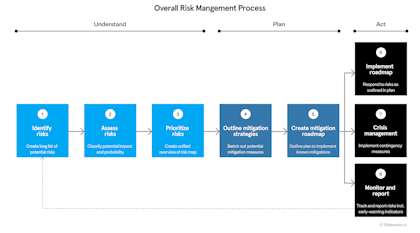
In every project that ends in an implementation plan there will typically be some unknowns or risks associated with the proposed plan. This is especially true for radical new strategies or when launching new products or businesses. An important part of every project where this might be the case is therefore to identify, assess, prioritize, and plan for these potential risks. Once the implementation starts, you need to monitor and manage the risks according to your plan.
A risk mitigation slide is a visual representation of potential risks to a project or business venture and the strategies to address them. In other words, the risk mitigation slide sums up steps 1-4 in the risk management process.
How does the risk mitigation slide fit into a risk management strategy?
The purpose of a risk management strategy is to:
- Decrease the probability of a risk happening or, if possible, completely remove the risk
- Decrease the level of impact if the risk where to happen
In this context, the risk mitigation slide serves several important purposes:
- Identification: It lists the key risks that could impact the success of a project or business.
- Assessment: It most often includes an evaluation of the likelihood and potential impact of each risk.
- Mitigation strategies: For each identified risk, it presents specific actions or plans to reduce the probability of the risk occurring or to minimize its impact if it does occur.
- Accountability: It may assign responsibility for managing each risk to specific team members or departments.
- Transparency: It demonstrates to stakeholders that potential problems have been considered and planned for, showing due diligence and foresight.
When done well, the risk mitigation slide is an effective and efficient way to communicate your overall risk management strategy and crucial to ensure you have thought through and planned for the potential downfalls and barriers to implementing your proposed solution.
You can read an excellent McKinsey article on building resilience through better risk management here. Or check out a new approach to risk management from BCG here.
How to create risk mitigation slides like McKinsey consultants
To create a risk mitigation slide you essentially need to run through steps 1-4 in the above figure. Once you have completed these steps, you summarize the findings in a visual representation in the risk mitigation slide(s).
Step 1: Identify the potential risks
Although you can of course never know what you don’t know and unexpected things will always happen, you can still list known risk factors.
A practical way to do this is to think through each type of risk and how they might apply to your particular project or plan. The typical risk categories are:
- Financial risks (e.g., budget overruns, funding issues)
- Technical risks (e.g., technology failures, integration problems)
- Operational risks (e.g., supply chain disruptions, resource shortages)
- Legal/Compliance risks (e.g., regulatory changes, intellectual property issues)
- Market risks (e.g., changes in customer demand, competitive threats)
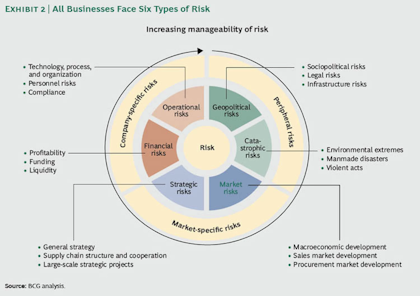
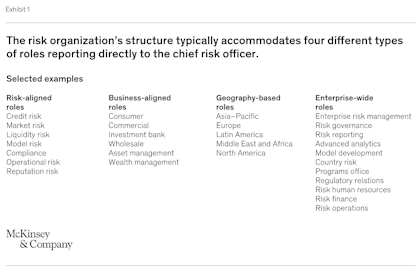
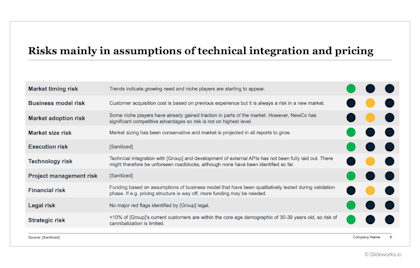
You can look up specific typical areas of risk for your industry or type of business to kickstart your brainstorm. See examples on types or categories of risks from BCG and McKinsey in the figures below.
Step 2: Assess each risk
Now that you have a list of risks you want a way to understand and compare the severity of each risk to the rest to later decide where and what to spend money mitigating and monitoring.
Therefore, you need to assess each risk on two dimensions:
- Impact: What is the impact on our project/business/venture if this risk were to occur?
- Probability: How likely is it that this risk will occur?
The risk severity is then defined as:
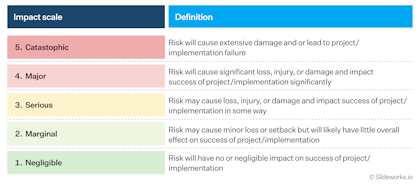
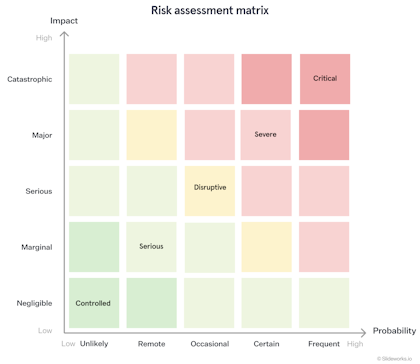
You typically want to grade both the impact and probability dimensions on a simple scale, e.g., an impact scale that runs from negligible to catastrophic.
You can also simply assess each risk with a classic traffic light scale of green-yellow-red, depending on what level of depth you need. Then the colors often correspond to the following:
- Low probability/low impact: Green
- Medium probability/medium impact: Yellow
- High probability/high impact: Red
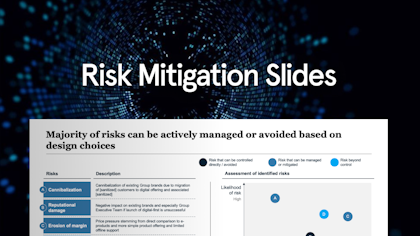
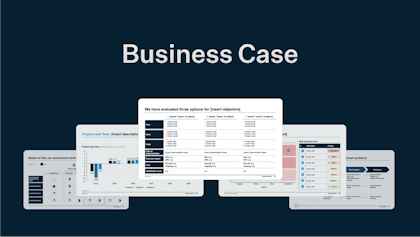
See an example of how this is done in real cases in the below slide from our Business Case PowerPoint template.
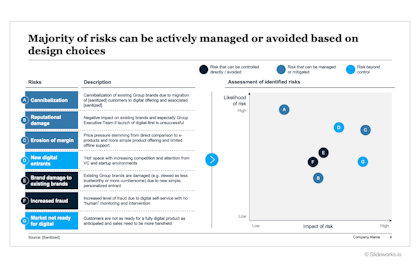
Step 3: Prioritize risks to create an overall risk map
Once each risk has been scored, you should create a simple visualization to understand the overall risk picture.
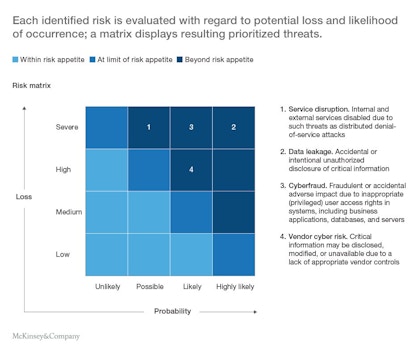
The most common way to do this is by plotting the risks in an impact-probability matrix where the most severe risks are in the upper righthand corner:
By using a matrix visualization you can quickly communicate how many risks are high-priority and prioritize which risks you need to put resources toward mitigating, if possible, or at the very least monitoring with early-warning indicators.
See some examples of risk severity matrices from McKinsey below.
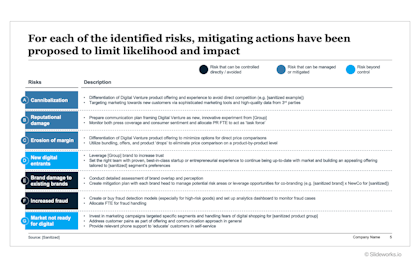
Step 4: Develop mitigation strategies for each risk
You now have a complete picture of the potential risks to your implementation plan. The next step is then to outline possible mitigations strategies for each risk.
Common mitigation strategies include:
- Avoid: Eliminate the risk by changing plans
- Transfer: Shift the risk to another party (e.g., through insurance)
- Reduce: Reduce the probability or impact of the risk
- Accept: Acknowledge the risk but take no action (for low-impact risks)
To optimize time, you should focus on high-probability, high-impact risks. For each risk, consider how this risk can be mitigated or potentially completely avoided. Write down the possible mitigation strategies, ideally with concrete actions that should be taken now or once the risk materializes. Consider naming an accountable person or team that “owns” that risk.
See an example of how BCG has outlined mitigation strategies below (the full deck can be found here).
Step 5: Summarize the previous steps in one or a few slides
The final step is creating the actual risk mitigation slide(s). Since you have done everything up until now, this step is simple. Just take everything and condense into a few simple slides like the example below from our Business Case PowerPoint template.
Best practices for creating risk mitigation slides
- Keep it concise: Focus on the most significant risks for your context. Too much information can overwhelm your audience.
- Use clear language: Avoid jargon and explain complex concepts simply.
- Be specific: Instead of vague statements, provide concrete mitigation strategies.
- Prioritize graphics: Use graphics/visualizations like a matrix to help your audience quickly grasp the overall risk picture.
- Add visual cues: Use color-coding or symbols to quickly communicate risk levels.
- Use a template: Base your risk mitigation slides on a tried-and-true template to leapfrog the layout process.
- Remember the general rules: Keep the general best practices like Action Titles and storylines in mind (see our blog post here for some more tips and tricks).
A well-crafted risk mitigation slide does more than just list potential problems - it demonstrates your team's proactive approach to challenges. By clearly communicating risks and strategies, you build confidence in your project's resilience and your team's capability.
Remember, the goal isn't to eliminate all risks (which is impossible), but to show that you've thought critically about potential obstacles and have solid plans to navigate them. With these tips and best practices, you're well-equipped to create a risk mitigation slide that will impress stakeholders and set your project up for success.